01 09 10
Showing posts with label Helen. Show all posts

11 February 2017

Endless Love ...


 Hello - it's Helen here with a little tutorial to show you to make this box.  It could be used for chocolates, jewellery or lots of treats!

To start with, you need to cut and score the box lid and base.   I've put the measurements on a piece of a white card to show you what you need to do:


 Cut two pieces of red card the same size as shown above but before scoring and folding trim 0.5cm off one long and one short side of one of the pieces.  Score both pieces as shown above.  The smaller piece will be the base of the box and the larger will be the lid.

Next cut both pieces as shown in the photo below:


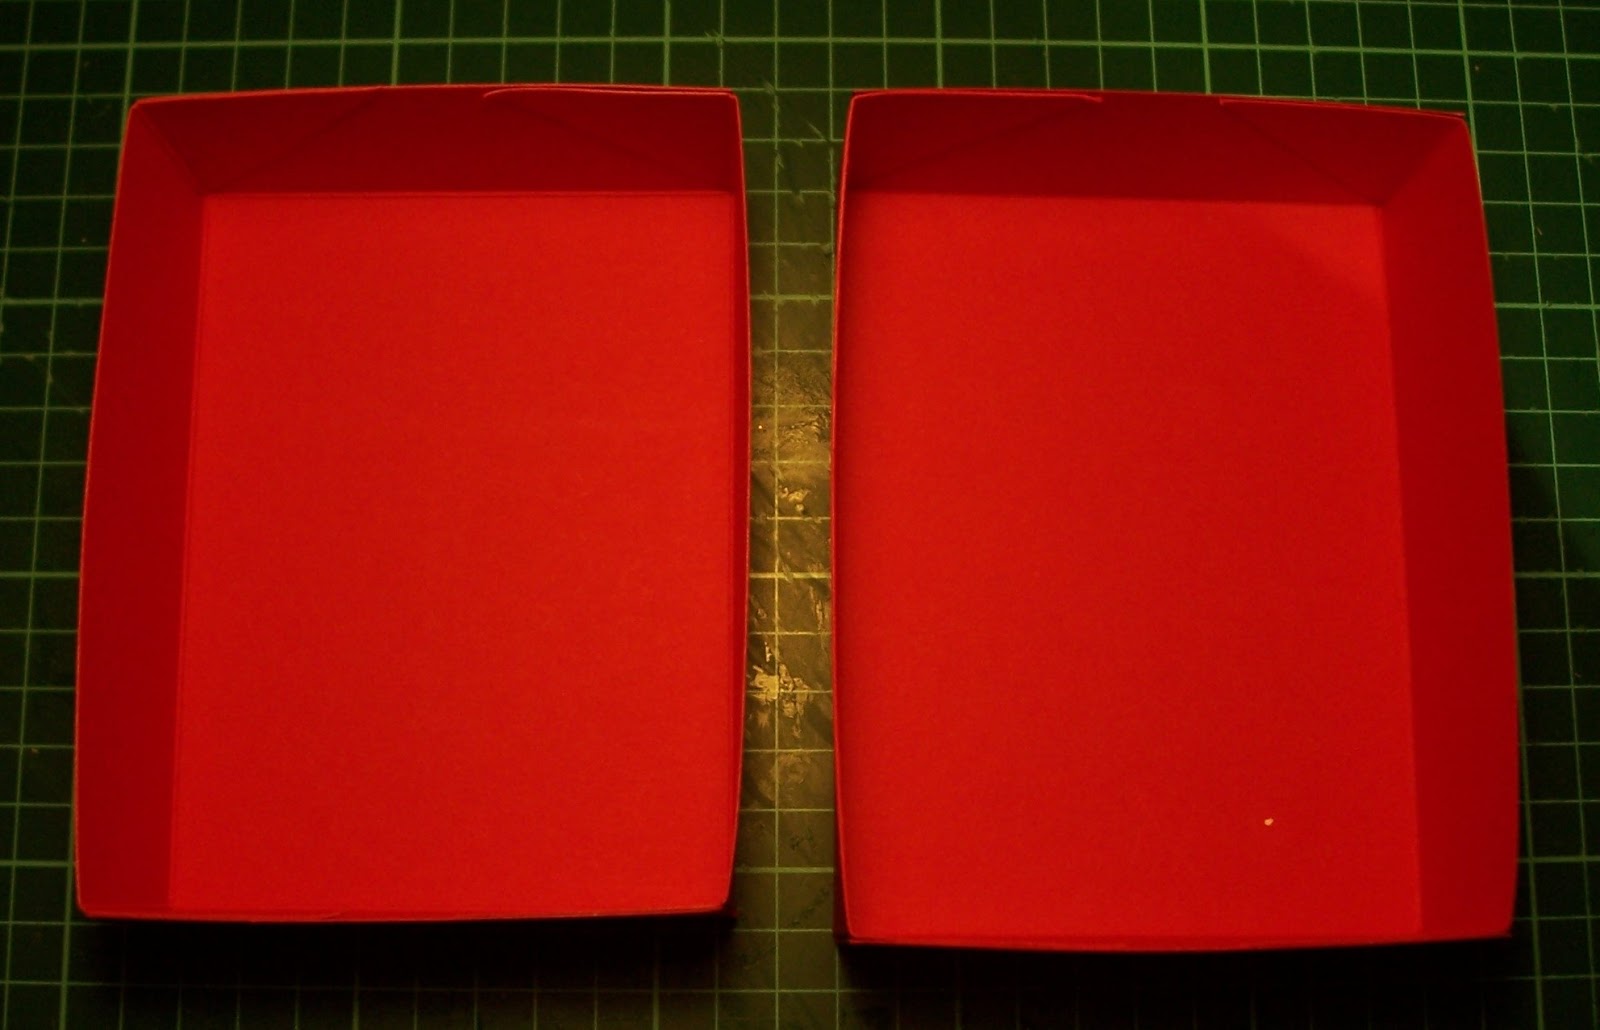
Fold the tabs round and stick to form the base and lid as shown below.  The best adhesive to use for this is double sided tape, ideally extra strong tape:

Stamp the 'Endless Love' stamp on to white card and colour.  Add a mat of red paper under the image.  Cover the box top with patterned paper and stick the image to the top of it:


 Add patterned paper to the sides of the box and some red Card Candi:


 I've finished the box with a die cut sentiment and some red gems:


 And here it is again:


Enjoy the rest of your weekend

14 January 2017

60's Fashion Card


 Good morning - it's Helen here to share a little tutorial for a card I've created using the '60's Fashion' stamp which you can find here.

First of all stamp your image and colour.  Cut a piece of white card to measure 14cm by 10cm and a piece to measure 4cm by 28cm:


Mat patterned and/or plain paper on to the larger rectangle.  Score the longer piece at 14cm, fold and mat paper on to this as well:


Stick the back of the long folded piece to the back of the other rectangle as shown below:


Mat the image on to black card and stick to the front of the folded strip.  Add some gems to embellish:


And here's a side view of the card:


Enjoy the rest of your weekend!

9 January 2017

Isobel - Thinking of Spring


Good morning - it's Helen here with my first inspiration card of the New Year!

I've used the beautiful 'Isobel - Thinking of Spring' stamp for my card - you can find her here on the Crafty Sentiments Designs website.

Enjoy the rest of your week

4 December 2016

Bell Ringer


Good afternoon - it's Helen here with a little bit of Christmas inspiration for you!

I've made a card using the very cute 'Bell Ringer' stamp - you can find him here on the Crafty Sentiments Designs website.

If you're still making your Christmas cards, there's still time to enter our current blog challenge here.  Our theme is 'glitter' so it's perfect for this time of year!

Enjoy the rest of your weekend.

10 October 2016

New Facebook Challenge - Anything Goes With a Crafty Sentiments Stamp or Digi


It's time for our October Facebook Challenge!

The challenge is 'anything goes' as long as you use a Crafty Sentiments Designs stamp or digi and you can find more details and upload your creation in our Facebook group here:

https://www.facebook.com/groups/122009671475602/
 
And this is my DT inspiration card for the challenge:


I've used 'Princess Mask' which you can find here on the website.

I hope you will come and join our challenge and I look forward to seeing your cards!

Helen x

27 August 2016

A Fun Christmas


Good morning - it's Helen here to share a little tutorial with you to make a card using acetate.

Here's what you need to do:

1. Use a square blank measuring 14.5cm square.  Cut off the front panel of the card leaving a small flap measuring 14cm by 3 cm.  From the piece you cut away, cut an identically sized piece.  Attach a piece of acetate to the inside of the top flap, sticking the second piece across the base of the acetate in linke with the other half of the card.


2. Cover the inside of the card with patterned paper


3.  Attach strips of patterned paper to the card flaps.  Stamp the 'A Fun Christmas' stamp, colour and then mat the layers.  Attach the image panel to the top and bottom panels as shown and decorate.  Add some pearls either side of the acetate.


And here's a side view showing the pearls:


Helen x

12 August 2016

Come on Teddy .....


I'm still on a roll with Christmas cards even though it's no longer Christmas in July!

For this card I used a very cute stamp called 'Come on Teddy' - you can find it here on the Crafty Sentiments Designs website.

I've layered some patterned paper on the card but still kept the stamped image as the focus of my card.

Please leave a comment to let us know you've visited!

Helen x

30 July 2016

A Fun Christmas!


Good morning - it's Helen here to share a little bit of Christmas in July inspiration and a little tutorial to make this card. 

I've used a stamp called 'A Fun Christmas' which you can find here on the Crafty Sentiments Designs website.  

First of all I stamped using Memento Tuxedo Black ink and then I coloured the image using Promarkers.  I trimmed the image to measure 10cm high by 9cm wide and then matted it on to blue card measuring 10.5cm by 9.5cm and more white card measuring 11cm by 10cm:


To create the card base I cut a piece of white card to measure 18.5cm by 13cm.  With the longest side of the card towards me, I scored at 5.5cm from the left hand side giving a folded card as shown in the photo below.  I decorated the card blank using white and blue card and patterned paper:


 I attached the image panel to the front flap of the card blank - the adhesive just needs to go on the top part of the image panel.


I finished the card with some punched snowflakes and pearls:


And here's a view from the side:


I hope you've enjoyed my little tutorial - please do leave a comment to let us know you've visited!

http://craftinghelen.blogspot.co.uk/

22 July 2016

Hark the Angel Sing!


It's Helen here to share a little bit of Christmas in July with you using the beautiful 'Hark the Angel Sing' stamp.

You can find the stamp here on the Crafty Sentiment Designs website.

I've kept the card background very simple to showcase the stamp - hope you like it!

Helen x

19 June 2016

Annabel - Party Girl


Good morning - it's Helen here to share a little tutorial to show you how to make this card.

I've used 'Annabel - Party Girl' which is on the website here to stamp my main design and then coloured with Promarkers.  I trimmed the image as shown in the photo below and then matted it on to dark brown card.


Next cut a piece of white card 12cm square and fold in half.  Completely cover with dark brown paper and then mat on paterned paper.


Attach the image panel to the card - make sure you put tape on the bottom half of the panel and decorate as you wish.


Enjoy the rest of your Sunday.

Helen x

17 June 2016

Josh - Apple Tree


Good morning - it's Helen here to share a little bit of inspiration for you using one of the great Crafty Sentiments Designs stamps.

This little guy is called 'Josh - Apple Tree' and you can find him here on the website.

Enjoy your weekend
Helen x

22 April 2016

Delightful Flowers


It's Helen here today to share a card I've made using the very cute 'Delightful Flowers' stamp.

Here's what you need to do:


1. Stamp the image, colour and then die cut with a circle die.  Cut a mat using the next size up of circle die.


2. Cut a piece of card measuring 8.5cm by 25cm and starting from the left hand side, score at 13cm, 15cm, 21cm and 23cm as shown on the template above.


3. I've used kraft card for my base card and then matted a piece of patterned paper measuring 8cm by 5.5cm on to the card panel as shown in the photo above.


4. Turn the card blank over.  As my card isn't double sided I've then added a piece of kraft card to cover the whole of the largest panel and then a piece of patterned paper measuring 8cm by 12.5cm.


5. To stick the card together, apply some strong tape on the last panel, folding the card first to see how it fits together.  Fold the card flat (as shown in the photo above) to make sure it sticks correctly.


6. The photo above shows what your card will look like from the side looking down on to the fold.


8. Add your image to the front shorter panel as shown in the photo above and then embellish.


and here's what the completed card looks like from the side:


Have a wonderful weekend
Helen x