01 09 10
Showing posts with label Tutorials. Show all posts

27 March 2017

Tag You Tutorial

Hi Crafters

Welcome back to Crafty Sentiments Designs Inspiration Blog,
today I have a tutorial for you all.

Showing how I made a card with stamp
called I Love Butterflies and how I Tag it.

Materials requirements are:
Cut & Boss Machine
Embossing Folder
Kraft Tag
Rectangle card, backing paper, sentiment, pearl drops
butterfly die
string


Step One
Pop your kraft tag and emboss two thirds
of your rectangle card as well


Pictures of the Embossed Tag and Card


  Step Two
Attach your image to the tag by using double sided tape
or glue then add your string.
Add the paper at the bottom of your card
Then add your tag, little off side on the card


Final Step Three and card
Add sentiment, butterfly die and gem
Distress edge of sentiment
add dewdrops,
add glossy accents to the butterflies around the image


Thanks for stopping
See you all again next month.

Cheers
Sue N
xx

30 January 2017

Dies,Matting and Layering Tutorial

Hi Crafters

Today I have tutorial using dies, matting and layering for make a card

I have used the stamp called

Materials
Fancy dies from spellbinders, white card, promarkers,
checked backing papers, yellow card,
flag die banner, checked card, sentiments,
checked banner for sentiment

Step One
Take your fancy die and cut out your image using
your die cutting machine


Step Two
After cutting out with the die,
I also cut out the eight swirls in each corner to give
a different look to the die cut shape


Step Three
Attach your die cut image to backing paper
square as below

 Step Four
Take this and add to yellow card.
Try to get close to the edge of the
yellow card and cut out your square
by using cutter or scissors as below

Step Five
Take your 6 x 6 white card, add a layer
of checked backing paper
Using checked card cut into small strips and
stick onto the first layer of backing paper and each side
At the bottom of the card add the sentiment banner


Final step and final card
Add the first matting and layer part of the card
to the 6 x 6 card in the centre of the card as below
finally add the die cut banner giving another layer to your card
add the sentiment for finishing touch.

Hope you enjoyed this tutorial, please leave a comment

Cheers
Sue N
xx


27 December 2016

Door plate

Hello,
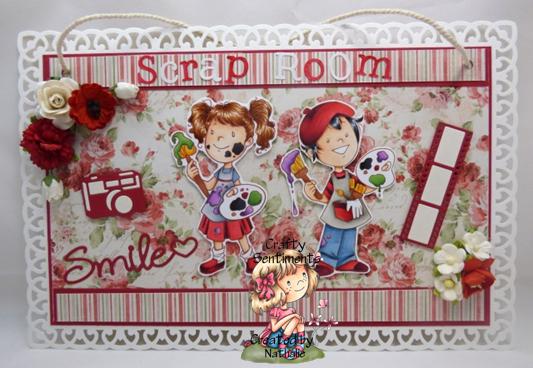
this is my new project for Crafty Sentiments Inspiration : a door plate.


For this project, you need :
carton : 6, 75 inch x 10, 25 inch and cut around the page with punch.


cardstock : 23.1 cm x 14.3 cm
                         2 x (1, 8 cm x 22.7 cm)
Papers :  22.7 cm x 13.9 cm
                    2 x (1.4 cm x 22.3 cm)


You stick all papers following the sketch.


You drill a hole on each side at 2cm .


For this project, I use "Isobel Let's paint" & "Josh Master painter" and colouring them with my copics. You will decorate as you want.
Thank for your visit.

26 November 2016

Tutorial by Sue

Hi Crafters

A tutorial for you all, hope you enjoy this.

How I made this card using mulberry flowers.

Instructions are:-
Colour your image with your favourite medium
I used promarkers pens


Next I used patterned flower Christmas papers
and added to my white card
I then used criss cross dies and cut the image out and
used red papers cut out using the large size criss cross die
mount together on your card


Then prepare your mulberry flowers
glue one onto top of another, slightly move to
cover the gap see below

Using your gems at one in centre of each
completed mulberry flowers sets


When all finish add to your card
 see below completed card
Finish touch scalloped red circle,
add sentiments and glue to card.


Thanks
Cheers

Sue
xx


23 October 2016

Lemonade Time

Hi Crafters

Little tutorial on how I made this card.

I'm using a delightful stamp image from the Crafty Sentiments shop HERE !

Materials
6 x 6 scalloped white card
yellow spotted paper
yellow card, distressed ink
scalloped square dies
mulberry prima flowers
sentiment
promarkers
stamp image


step one
Using scalloped die, die cut your image
used washi tape to keep secure while cutting

step two
die cut four different sizes with the scalloped dies using yellow card


step three
cut a square of the yellow spotted paper
and stick to your 6 x6 white card


step four

stick your four different sizes yellow card on the white card
where you wish, I placed on an angle


 step five
using distressed inks, distressed around the image


Finally stick the image, sentiments and mulberry paper flowers
to your card, now it's completed.


Please leave a comment and come back soon for more inspirations.
Cheers
Sue N
x

22 September 2016

Tutorial by Sue

Hi Crafters

Welcome back to Crafty Sentiments Designs Inspiration Blog.

Today I have a tutorial using hand drawn sketch.
Materials you need is two coloured card, gems,
promarkers, pink card circles,
CSD Image


 My Sketch to make my card


 Take your white card, add backing card.
Cut four strips of card in different card colour
add as below with double sided tape


 The next part is to add your circle image using double sided tape or glue


Next you add the side strips and add two pink circles
Finally add the six pearls gems as per the sketch
Now the card is finished

Thanks for calling by, please leave a comment.

Cheers
Sue N
xx

7 February 2015

you and me- will you? for Crafty...

Hi all 

It's my turn today
and I choose to introduce you my mini album 
" you and me "

using
3 cards- one 15x15, the second 11x11 and the last 10x10
1 envelop 11x11
Paper Disa déco time- cardboard pattern 8
cardstock
Die Versions edge "you and me"
X cut nesting dies square 
Heartfelt die layered elegant swirl
Mémory box die la rue flourish
Spellbinder nestabilities label nine 
flowersand leaves  of my stash- ribbons- charm heart- half pearls


cover 
I stuck the sheet n°1 (4.5x15) vertically
then the sheet n° 2 (4.5x14.5) horizontally 
and finally the smaller cards, 10 x 10, so 0.5 on the edges
and with the X cut nesting dies, made some squares


 little card open
I stuck 2 sheets n° 3 (9.5x 9.5)
a tag and a stamp


great card open
I stuck 2 sheets n° 4 (14.5x 14.5)
after putting the "you and me " edge
on the left side the last card 11x11
on the right side the envelop 11x11


great card open
I stuck 2 sheets n° 5 (10.5x 10.5)
using the Heartfelt die 2 times to make something like a door
the Mémory box die on the right


card 11x11 open
using Nellie Snellen heart dies


under the envelop
using Spellbinder labels 9


the envelop 11x11 open
and the hidden cards


the back of the card
I stuck the sheet n°1 (4.5x15) vertically
then the sheet n° 2 (5x15) horizontally 
and a rose 

Hope you love it...
happy crafting all
xoxo


6 February 2015

Valou - "A Cage's Card" with tutorial

Hello everybody!

Valou here, for my inspiration for the last day "Advent Calendar"!

Here is in images!


I used some paper " Bazzil Cardstock cremates " and some paper "Action". Edges are inked to the ink "Distress Walnut Stain".
 

I used rubberstamps "Crafty Sentiments".

I colorized it with the following ink " Distress ":

- Ink "Distress Tattered Rose" and "Distress Vintage Photo" for the skin.
- Ink "Distress Antique Linen" for hair.
- Ink "Distress Fayded Jeans".
- Ink "Distress Picked Raspberry".
- "Glitter Stickels Diamond".

I cut the image and I stuck it with pieces of "Foam Tape".


For the decoration, I added the following embellishments:

- Cut "Parasol" realized with the machine " Silhouette Studio ".
- Double-knot realized with the ribbon " blue Organza ".
- Charm "Love".
- Lilidafts whites.
- Blue Rose (30 mm).
- Pink Rose (15 mm).
- Pink Rose (20 mm).
- Die-cuts "Butterflies" realized with a dies " Noor! Design ".


(click for dowload)

Here we are! I hope that my realization has you more and that it will inspire you.

I thank you for your passage and wish you an excellent day! Bye for now!

Hugs,